How to Prepare a Site for Effective Camera Installation
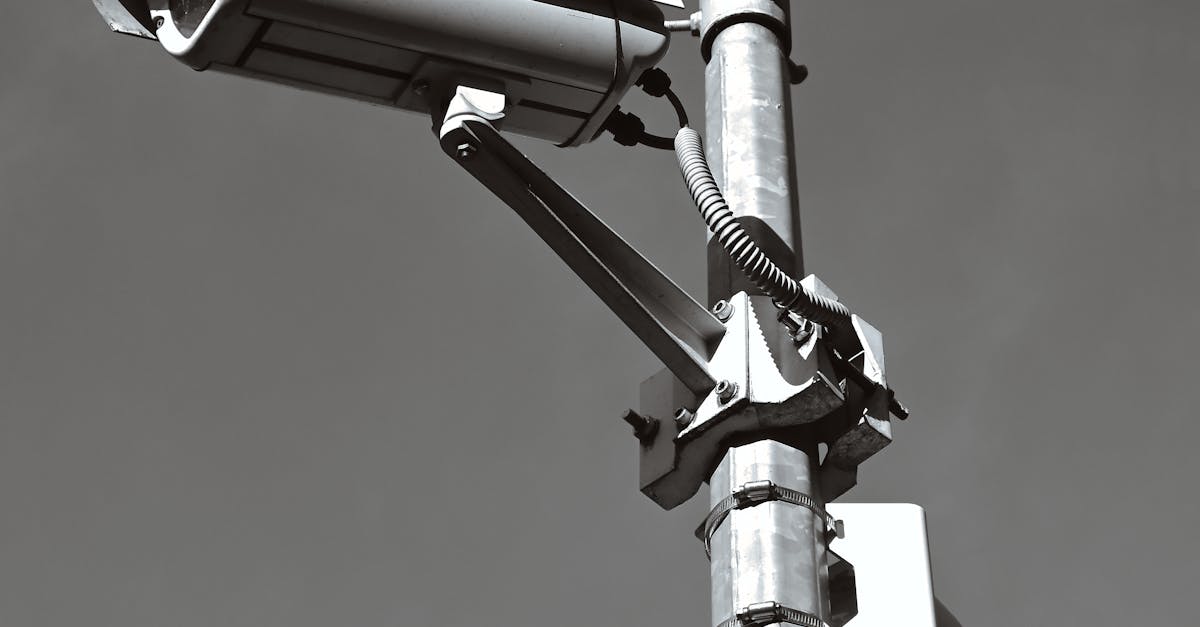
Table Of Contents
Securing Internet Connectivity
A reliable internet connection forms the backbone of an effective camera installation. Assessing the existing network capabilities is crucial before proceeding. Ensure that your router has the capacity to handle multiple devices simultaneously. The proximity of the cameras to the router significantly impacts performance. If cameras will be positioned far from the router, consider investing in Wi-Fi extenders or mesh network systems to enhance coverage.
Additionally, it may be worthwhile to explore the option of using Ethernet cables for a direct connection. Wired connections provide increased stability and reduce the risk of signal interference. This method offers a more secure and reliable solution, particularly in areas prone to Wi-Fi disruptions. Careful planning of the network layout will support a seamless integration of cameras and ensure optimal functionality.
Evaluating Wi-Fi Signal Strength
Assessing the strength of your Wi-Fi signal is crucial for successful camera installation. Ideally, cameras require a strong and stable internet connection to transmit data effectively. Begin by determining the proximity of your camera to the Wi-Fi router. A greater distance can lead to signal degradation. Also, consider potential obstructions such as walls, furniture, or appliances that may interfere with the signal.
Utilising applications or devices to measure Wi-Fi strength can provide valuable insights into the connection quality at the installation site. Aim for a signal strength of at least -70 dBm for optimal performance. If the signal is weak, consider repositioning either the router or the camera. In some cases, investing in Wi-Fi extenders or upgrading to a better router might be necessary to ensure a reliable connection, enhancing the overall functionality of your security system.
Installing Necessary Mounting Hardware
Selecting the appropriate mounting hardware is crucial for a successful camera installation. The type of bracket or mount you choose will depend on the specific camera model, its intended placement, and the environment it will operate in. Fixed mounts are ideal for stationary setups, while adjustable mounts offer flexibility for changing angles. Additionally, ensuring the brackets can support the camera’s weight and provide stability is essential, as a secure mount will reduce the risk of accidental movement or damage to the camera.
Before proceeding with installation, it’s important to verify that the mounting hardware is suitable for both the mounting surface and the conditions it will face. For outdoor installations, using corrosion-resistant materials can significantly enhance longevity. Installing motion-detection cameras may also require specific mounting brackets to optimise coverage and range. Proper alignment during installation is key, as even slight misalignments can impact the effectiveness of the camera's field of view.
Selecting the Right Brackets and Supports
Choosing the appropriate brackets and supports is essential for ensuring that cameras remain stable and positioned correctly. Different types of cameras may require specific mounting solutions, depending on their size and intended placement. For instance, heavier models might need robust brackets made from durable materials, while lighter cameras can utilise simpler or more decorative mounts. Evaluating the camera’s specifications will guide you toward the most suitable options, allowing for optimal installation.
Installation site considerations play a crucial role in selecting these supports. Features such as wall material, whether brick, wood, or plaster, will often dictate the type of mount necessary for secure fitting. Additionally, adjusting the angle of the camera for the best coverage can be more easily accomplished if the chosen bracket allows for tilt and swivel capabilities. Assessing these factors will help in making an informed decision, ensuring long-term performance of the installed surveillance system.
Taking Weather Considerations into Account
Outdoor cameras face a range of challenges from environmental factors. Heavy rain, intense sunlight, and fluctuating temperatures can all impact the performance and lifespan of surveillance equipment. Selecting weather-resistant models is crucial. Look for cameras with an IP (Ingress Protection) rating indicating their level of protection against dust and moisture. This rating provides insight into how well the camera can withstand various weather conditions.
Proper placement can mitigate some potential weather-related issues. Ensure that cameras are positioned under eaves or awnings to shield them from direct rain and reduce glare from sunlight. Additionally, consider using protective housings that offer extra shielding. This will not only safeguard the camera but may also help in maintaining optimal operational efficiency throughout the year.
Protecting Cameras from Environmental Elements
Outdoor surveillance cameras face various environmental challenges that can affect their performance and lifespan. Elements such as rain, snow, dust, and extreme temperatures can compromise camera functionality. Selecting weather-resistant models is crucial. Look for cameras with an IP (Ingress Protection) rating that indicates their ability to withstand moisture and dust intrusion. This rating provides assurance that the camera will perform reliably in adverse weather conditions.
In addition to choosing the right equipment, careful positioning can enhance protection against environmental factors. Installing cameras under eaves or other sheltered areas helps shield them from direct exposure to rain and snowfall. Using protective housing can further guard cameras against harsh winds and temperature fluctuations. Maintaining clear visibility while ensuring adequate protection is essential for effective surveillance. This careful planning ensures that the cameras remain operational and provide reliable monitoring throughout their intended lifespan.
FAQS
What is the first step in preparing a site for camera installation?
The first step is to secure internet connectivity, as a stable internet connection is essential for the effective functioning of your cameras.
How can I evaluate the strength of my Wi-Fi signal for camera placement?
You can evaluate Wi-Fi signal strength by using a Wi-Fi analyser app on your smartphone or tablet, which will provide information on signal quality and coverage in different areas.
What type of mounting hardware do I need for my cameras?
The type of mounting hardware you need depends on the weight and type of your camera. Common options include brackets, wall mounts, and ceiling mounts, which should be chosen based on the installation location.
How do I choose the right brackets and supports for my camera?
When selecting brackets and supports, consider the camera's size and weight, as well as the surface it will be mounted on. Ensure that the chosen hardware can support the camera's specifications and is suitable for outdoor use if necessary.
What factors should I consider regarding weather when installing cameras?
You should consider the local climate, including rain, snow, humidity, and temperature extremes. Additionally, make sure to protect your cameras with weatherproof housings or enclosures to safeguard them from environmental elements.
Related Links
Safety Protocols for Commercial Camera Installation ProjectsStep-by-Step Guide to Installing Commercial Security Cameras
Tips for Seamless Integration of Commercial Camera Systems
Common Pitfalls to Avoid During Commercial Camera Installations
Streamlining the Installation Process for Multi-Site Camera Systems
Best Practices for Positioning Commercial Cameras During Installation
Key Considerations for Installing Cameras in Large Facilities
Understanding Cable Management in Commercial Camera Installations